Conventions
|
|
This is additional information |
|
|
This is a tip |
|
|
This is an example configuration or setting |
What is SSH-Conduit?
It is a suite of ways to privately make the resources of a system or a LAN available on another system.
A system may concurrently perform two roles:
-
Access resources from a remote system or LAN
-
Provide resources from the local system or local LAN to a remote system
Access to remote resources is available in the following ways:
-
CLI Open a terminal to a remote system
-
FS Add/remove a remote folder to/from a local system
-
VNC Operate the desktop of a remote system
-
VPN Join/leave a remote network
Any or all of the above may be used at the same time and/or be provided from the local system to a remote system.
You may use any of the suite components that access remote resources in two ways:
-
Make an ad hoc connection by manually inputting the information for each session
-
Create and save a profile that may be selected manually or automatically for a session
It is anticipated the primary way of using a suite component will be via a profile. Each suite component may have multiple profiles. During launch, any or none of the profiles may be chosen before a connection is made. Any one of the profiles can optionally be designated as the preferred profile. In that case it is automatically loaded and connected at launch time.
The systems contact each other across either the internet or local network. The connection is automatically encrypted to provide privacy during the session.
The suite is self contained. Except for an ISP, connections across the internet do not depend upon the availability of third party services. Creation of external facilities or registration with their providers are not required. Additional financial commitment is not needed.
Typical Use Cases - Client Role
CLI
Command Line Interface mode is useful whenever any or all of these apply:
* You prefer to work by typing commands,
* The remote server system does not run a desktop GUI,
* You want to minimize the resources used by your local client system.
FS
File System mode enables you to work with folders and files that are kept on a remote system. From your local laptop you create a secure encrypted connection to the remote system and automatically mount the remote folder tree into the local laptop folder tree. This makes the remote folders and files available to use in apps on your local laptop. You use them as if they are kept in your local laptop.
VNC
Virtual Network Computing mode is useful whenever a remote system is running the suite VNC server and any or all of these apply:
* You prefer to work by clicking icons and buttons in a graphical desktop,
* You want to see the desktop of the remote system on the desktop of your local screen,
* You want to run apps using the CPU/RAM/storage of the remote system.
VPN
Virtual Private Network mode is useful when you are concerned about browsing the web from an untrusted location such as an hotel. On your laptop in the hotel, you create a secure encrypted connection to your trusted LAN at your home. All your web browsing is then automatically conducted via your home LAN as if you were physically sitting at home. You browse the web privately with all traffic passing within the secure encrypted SSH tunnel.
Suite Characteristics
Some common aspects apply in all cases:
-
The suite does not change any configuration of SSH you have implemented
-
The remote system that provides the resources must be running the SSH server daemon
-
To access remote resources, you must have an account on the remote system
-
An encrypted connection is established before the access session is granted
-
The access session does not require anyone to be present at the remote system
-
Launching an access session may be done with or without a profile that details how to connect
-
During the launch of an access session you may manually choose one of multiple profiles, or use one automatically
-
The automatic use of a preferred profile may be bypassed during launch
All access sessions can connect via a LAN or the internet, except a VPN session which is via internet only
When accessing remote resources across the internet:
-
The remote firewall/router must previously have been set up to forward a port to the system within the remote LAN on which the SSH server daemon is running
-
The forwarded port number may be any available number you choose to use
|
|
Each firewall/router handles port forwarding in its own way, this means there is no single description that can cover all variations. You should refer to the user manual to do the setting up. |
|
|
If you are accessing remote resources across a local network rather than the internet, there is no need to forward a port from the firewall to the system on which SSH is running. In that case, both systems must be in the same local network i.e. behind the same LAN firewall/router. |
When providing resources from the local system or local LAN to a remote system:
-
An admin/info centre is available to report the status of, and enable limited management of, relevant services
When in use the suite components:
-
Place very few demands on your system resources
-
Are suitable to run on both modern powerful kit and older less capable machines
Network Aspects
The suite does not change any netwoking configuration you have set up.
In the same way any other network based application, e.g. a web browser, needs networking to be operating normally, so does the suite. It relies on networking running in the usual way between the local and remote systems.
The Network performance of a system can be influenced by any combination of, the vast range of potential kit, the huge variety of software that might be installed, the way applications are used, the enormous number of ISPs. This means there are some factors beyond the control of the suite.
Constraining factors that might be present in either or both of the local and remote locations:
-
Capability and resources of either system e.g.
-
Video adaptor and driver
-
CPU power
-
Amount of physical RAM
-
Storage read/write speed
-
Network adaptor speed
-
-
Reliability of connection to either network
-
Congestion of either network e.g.
-
The number of concurrent network users
-
The nature of the tasks the network users are conducting
-
-
Quality of service settings on either network
Constraining factors that might be ISP dependent:
-
Speed of the modem making the connection to the ISP
-
Upload/Download speeds governed by the ISP
-
Congestion of the ISP network
-
Any other traffic shaping model imposed by the ISP
Accessing Resources from a Remote System or LAN
The first time you connect to a remote system you will be asked whether to accept and store its key fingerprint. If you decline, the connection will not be established and the access session will not start.
The range of ways in which the suite may be used mean it is impractical to try and cover every variation. The following examples illustrate some basic ways the suite can be used. You should adapt them to meet your particular circumstances or needs.
Illustrative Model
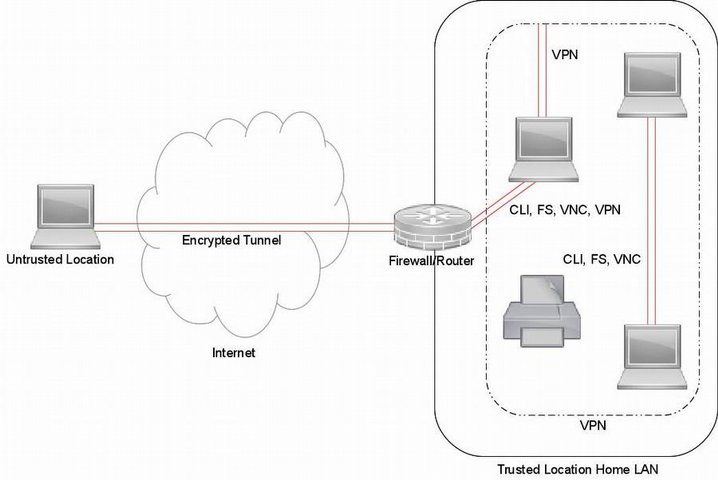
The examples which follow below are based on this simplified model. It shows accessing remote resources within a LAN and also across the internet.
In both cases:
-
Each of the systems providing the resources is running its own copy of the SSH server daemon
-
An encrypted tunnel is established and all traffic passes privately within it
-
For VNC access, each of the systems providing the resource is running its own copy of the suite VNC server
-
The IP address used in the examples is for illustration purposes only
In the case where access is across the internet:
-
A port in the firewall/router is forwarded to the system within the LAN on which the SSH server daemon is running
-
The IP address and forwarded port number used in the examples are for illustration purposes only
Example CLI Access Across the Internet, No Profile Used
In this example:
-
A profile for CLI access does not exist
-
You will manually input the connection details
-
When the remote system authorises the connection a termial window is opened to it
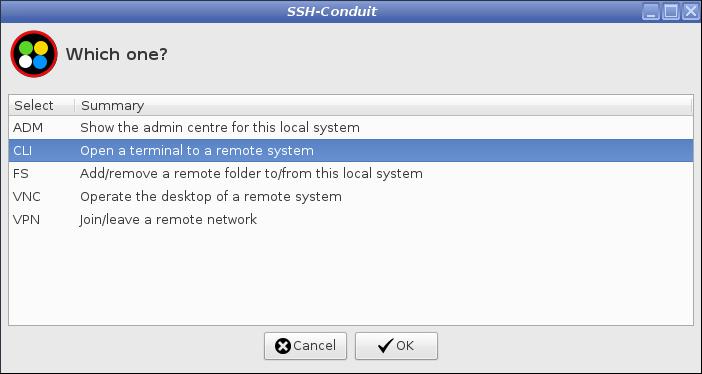
From the suite main menu start CLI access mode
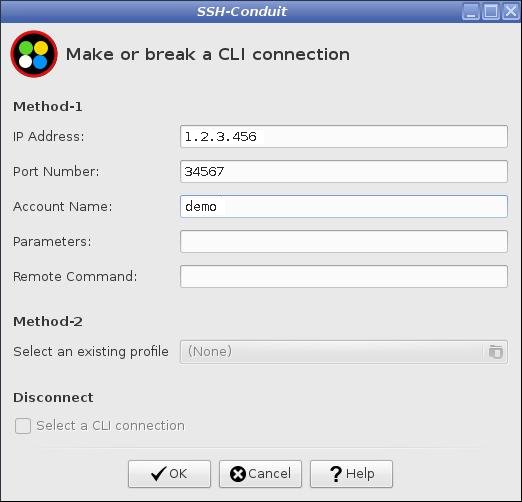
Input:
-
The external address of the remote firewall/router
-
The port number the remote firewall/router forwards to the remote system that is running the SSH server daemon
-
The user name on the remote system that will be used to log in to it
When prompted input the password for the remote account.
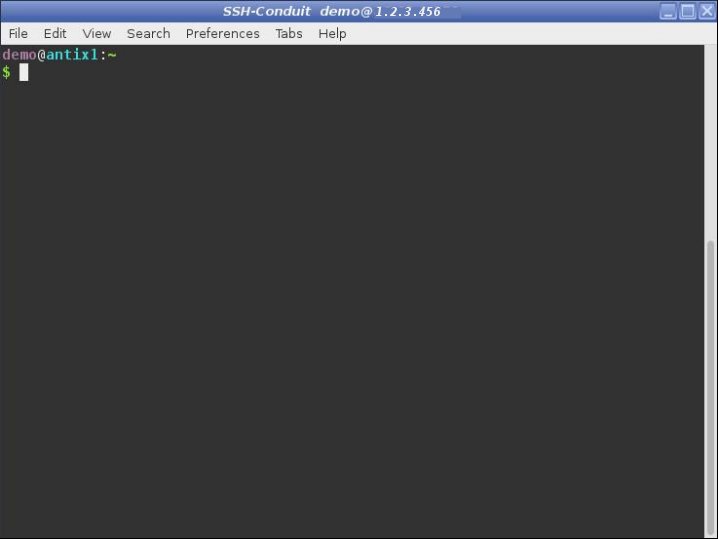
A terminal to the remote system is automatically opened.
The user name and IP address is shown in the window title bar.
Example VPN Access Across the Internet, Preferred Profile Used Automatically
In this example:
-
You will start and immediately stop VPN mode without making a connection to ensure a template profile exists
-
You will copy the template profile and edit it to contain the connection details
-
You will nominate the profile as the preferred profile
-
You will start VPN mode which without further input will automatically use the preferred profile
-
When the remote system authorises the connection an icon is added to the task bar
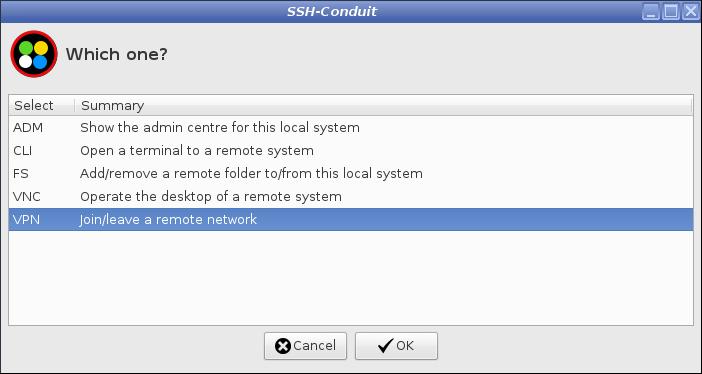
From the suite main menu start VPN access mode
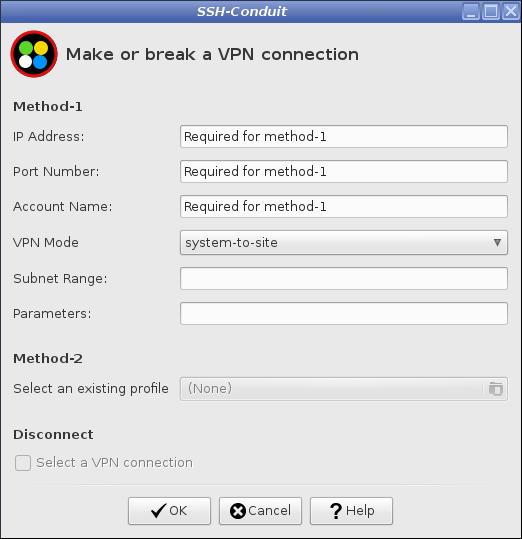
Immediately press the Cancel button without inputting any details.
The suite automatically puts a template profile in place.
Use your file manager to create a copy of the the template profile.
It is stored in a hidden file in your home folder .config/ssh-conduit/sshuttle/profiles/ssh-conduit template profile.sshuttle.
Give the copy a meaningful name e.g. vpn to home lan as demo.sshuttle.
|
|
sshuttle is the name of the application which SSH-Conduit uses for VPN connections |
Open vpn to home lan as demo.sshuttle in your text editor and input the connection details.
|
|
Example vpn profile connection details |
For this example all other configuration values may safely be left empty.
After entering and saving the details, your choices will be used whenever the profile is selected.
The final step is to nominate the profile as the preferred profile so it is automatically used
In your text editor open the hidden file in your home folder .config/ssh-conduit/sshuttle/sshuttle.conf
Input the name of your preferred profile
|
|
Example nominating a preferred vpn profile |
For this example all other configuration values may safely be left unchanged.
From the suite main menu start VPN access mode.
After a short countdown period a connection will be set up automatically.
When prompted input the password for the remote account.
To indicate a VPN connection, an icon is added to the task bar tray of your local system
![]()
Example FS Access Within a LAN, Preferred Profile Bypassed, Alternative Profile Selected Manually
In this example:
-
You must have multiple, fully configured profiles for FS access available from which you will make a selection
-
You must have previously nominated one of the available profiles as a preferred profile
-
You will bypass the automatic use of a preferred profile
-
You will manually browse for and use an alternative profile
-
When the remote system authorises the connection an icon is added to the task bar
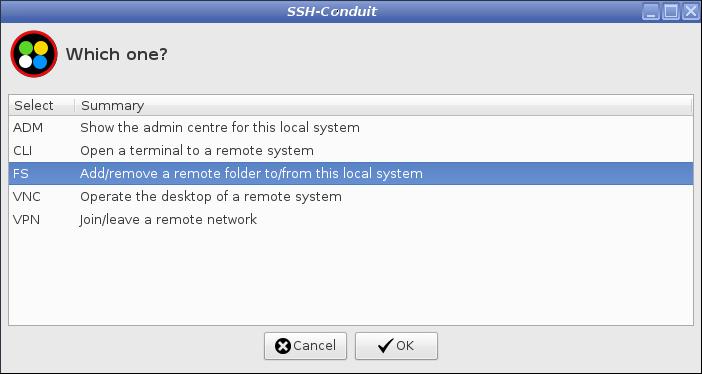
From the suite main menu start FS access mode
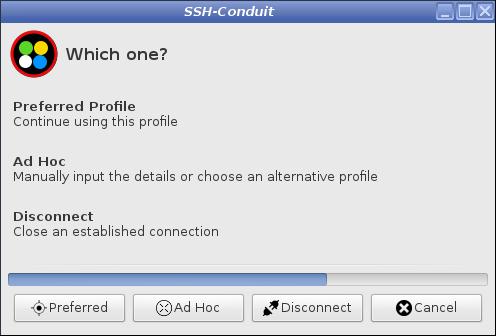
Press the Ad Hoc button before the countdown ends
|
|
If a button is not pressed, Preferred is automatically started after a timeout The countdown period can be adjusted in sshfs.conf. Each individual access component can be modified in a similar way by changing the value in its corresponding conf file. |
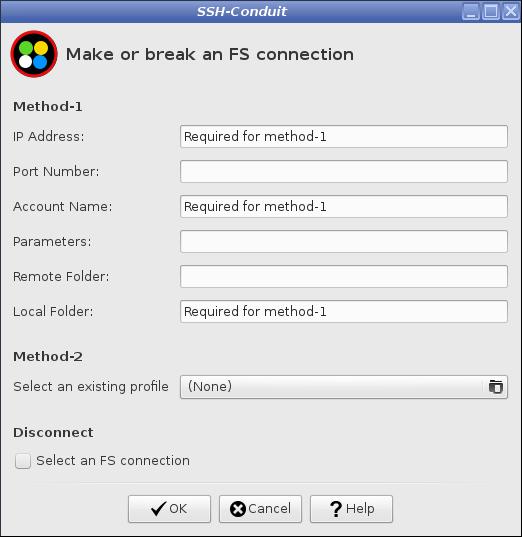
Choose Method 2 and press the button showing a folder icon to select an existing profile
|
|
This option is disabled unless the template profile and at least one other profile are available. |
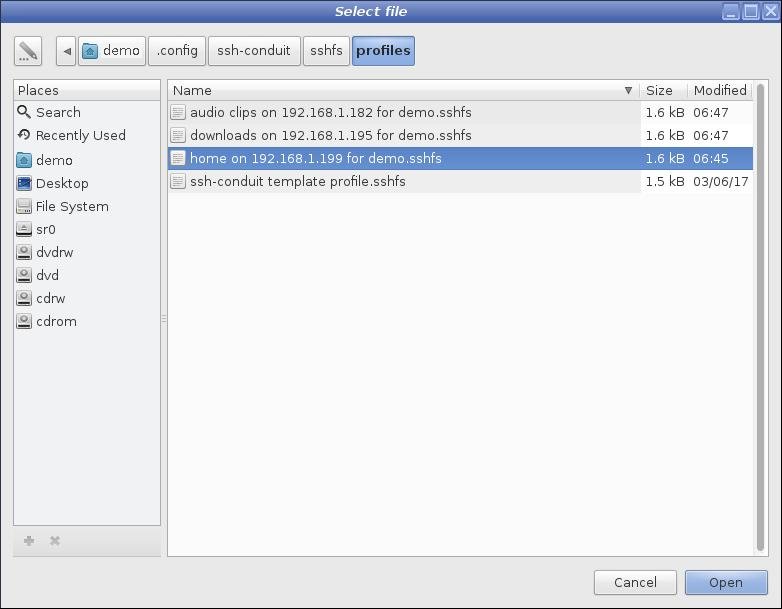
Select the profile to use and press the Open button
|
|
sshfs is the name of the application which SSH-Conduit uses for FS connections |
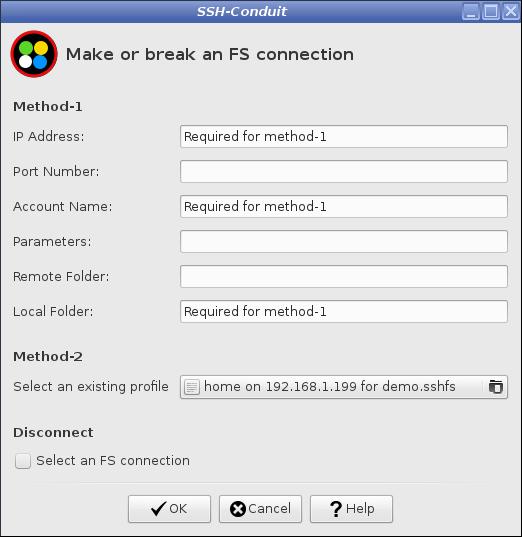
The name of the selected alternative profile is shown in the button.
Press the OK button to begin making the connection
When prompted input the password for the remote account.
To indicate an FS connection, an icon is added to the task bar tray of your local system
![]()
Example VNC Access Within a LAN, Preferred Profile Bypassed, No Profile Used
In this example:
-
You must have at least one, fully configured profile for VNC access
-
You must have previously nominated a profile as a preferred profile
-
You will bypass the automatic use of a preferred profile
-
You will manually input the connection details
-
When the remote system authorises the connection a window will open showing the remote system screen on your local desktop
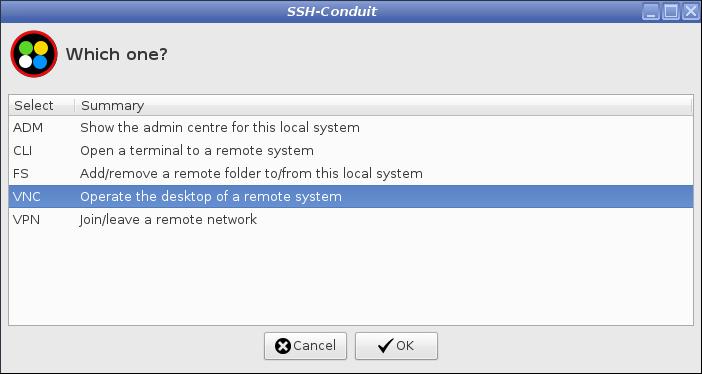
From the suite main menu start VNC access mode
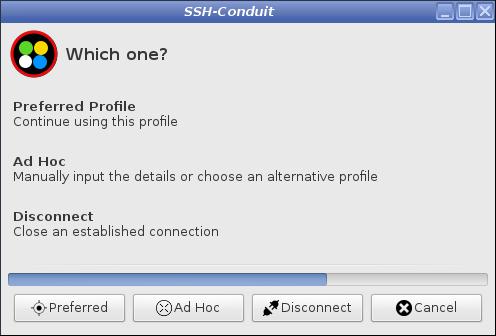
Press the Ad Hoc button before the countdown ends
|
|
If a button is not pressed, Preferred is automatically started after a timeout The countdown period can be adjusted in ssvnc.conf. Each individual access component can be modified in a similar way by changing the value in its corresponding conf file. |

Input:
-
The user name on the remote system that will be used to log in to it
-
The LAN IP address of the remote system that is running the suite VNC server
Press the Connect button
When prompted input two passwords:
-
One for the remote account login
-
One for the VNC server to open the session
|
|
An alternative to being prompted for the VNC password is to input it in the VNC Password field in the above window If the SSH VNC Viewer window is too small for comfortable use, increase the size of the font in ssvnc.conf. The window will adjust to accommodate the text size. |
|
|
It is recommended you do not save the profile by pressing the Save button. Doing so will create a profile that is different to the suite standard template. It will be more difficult for you to edit and may omit optimizations the standard template contains. The recommended way to create a profile is by copying ssh-conduit_template_profile.ssvnc, in a similar way to that described in an example above. |

A window showing the remote system screen is automatically opened.
|
|
A VNC access session is able to display the remote system screen whether or not anyone is logged into the remote system. In this way, an increased security risk can be avoided. Instead of leaving the remote system in a state where a user is permanently logged in, it may be left at its log in screen. In such a case, a standard log in may be performed by a user physically present at the remote location, or one connecting over a network to hold a VNC access session. |
|
|
If the remote desktop is too large to fit within your local desktop, refer to the section VNC Utilities. |
VNC Utilities
When the access session is granted and the desktop of the remote system is showing on your desktop, a range of built-in utilities become available.
Move the your pointer into the shared desktop and press F8.
A popup menu is displayed.
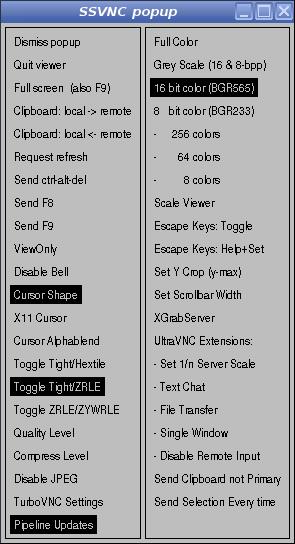
Select Dismiss popup to close the popup menu.
Select Quit viewer to end the session and the connection to the remote system.
The remaining entries are described in the installed or on-line manual SSVNC.
Some provide enhanced functionality, others affect perceived performance.
Some that might improve perceived performance
-
8 Bit Color reduces the number of colors in the shared desktop displayed on your local screen
-
Grey Scale displays only shades of grey in the shared desktop displayed on your local screen
Some that will probably degrade perceived performance
-
Full Color displays the maximum number of colors in the shared desktop displayed on your local screen
-
Scale Viewer adjusts the size of the shared desktop displayed on your local screen
-
Set 1/n Server Scale adjusts the size of the shared desktop displayed on your local screen
-
Toggle Tight/ZRLE adjusts the way in which changes on the receiver desktop are handled on your local screen
|
|
Quality level, Compress level, and Disable JPEG only apply when using Tight encoding rather than the default ZRLE |
In addition to the popup menu tweaks, perceived performance might be improved by altering the screen resolution of the remote system.
In the shared desktop, adjust screen resolution to a lower value. The lower the value the more noticable is the potential improvement.
This is also a good way to ensure the remote desktop fits entirely within your local desktop.
Before closing the VNC access session, reset the remote screen resolution to its original value via the shared desktop.
|
|
Whatever performance tweaks are used, the amount by which performance changes will vary from system to system and network to network. |
Closing an Access Session
There are several ways to end an access session:
-
From the suite main menu, choose the access component you want to stop and press the OK button.
One of two screens will be shown depending on whether a profile exists for the component.
From either screen you can disconnect and end the session. -
You may left-click either of these icons whenever thay are showing in the system tray of the task bar.


-
A CLI session should be closed by typing the command exit into its terminal window.
-
To end a VNC session, place your pointer arrow within the remote desktop window, press F8 on your keyboard and select Quit viewer.
Providing Resources to a Remote System
Prerequisites on the system providing the resources:
-
SSH server daemon is running
-
A user account exists for each user requesting an access session
Before access to a resource is granted:
-
A log-in request must be received via SSH from the system requesting an access session
-
The system providing the resource must authorise the log-in request
After a successful log-in, the requested resource is made available automatically.
Enabling VNC
Before providing VNC access, a few set up steps are required. These need to be done once only:
-
Create a VNC password the server will require to be supplied each time a remote system requests a VNC access session
-
Ensure the suite VNC server is available before and during every log-in and after every log-out
-
Show a VNC server icon in the task bar tray when the server is started automatically at boot-up and is currently running
Both creating a VNC password and enabling the VNC server are done via menu items
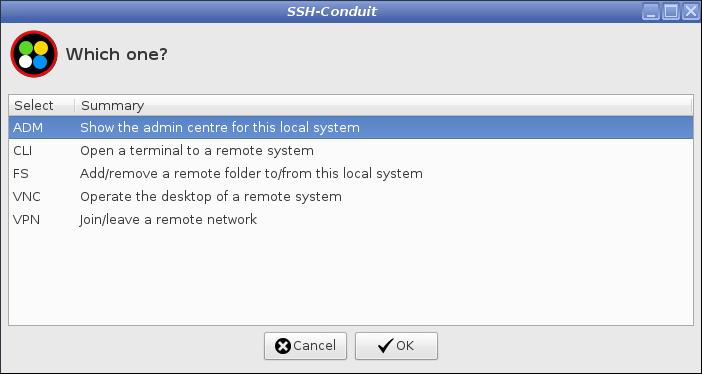
From the suite main menu start ADM administration mode
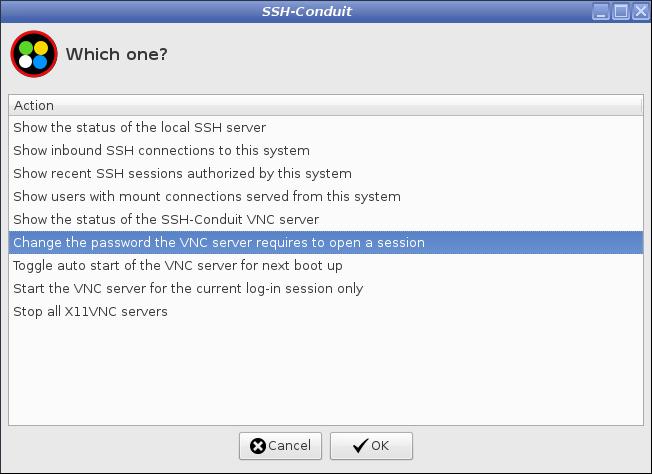
VNC Password
Before the server grants access to a session, the system requesting the access must supply a VNC password which the VNC server must authorise. This provides an additional layer of security and control over who is allowed to obtain a VNC access session.
From the menu select Change the password the VNC server requires to open a session
-
Input your local administrative password when prompted
-
Input the VNC password you want to set up
-
Confirm the VNC password
|
|
The password can be changed at any time by repeating the above steps. |
VNC Server Availability
Providing VNC is different to providing the other types of resources. It is the only type that requires its own server to be running. Although the amount of RAM used by the VNC server is tiny, in the interests of minimizing RAM usage it is installed in a deactivated state.
The primary goal of the suite is to access resouces on an unattended remote system. To do that, the VNC server needs to be available both before and after a user has logged-in. By starting the server as part of the system boot-up routine it sets itself up in the required way. It is available before and during a log-in and automatically restarts after a log-out.
From the menu select Toggle auto start of the SSH-Conduit VNC Server for next boot up
-
A message will be displayed indicating whether the server will or will not be started during the next boot up
-
Reboot the system
|
|
To cover unusual circumstances, a menu option is available Start the VNC server for the current log-in session only Because the server is not available before log-in or after log-out, the circumstances in which this mode is useful are quite limited. |
|
|
Only a single instance of the suite VNC server is permitted to run. |
VNC Server Icon in Task Bar Tray
The icon is shown while the server is running:
-
It changes colour to indicate when an access session has been granted
-
It provides a menu of server management tasks
-
It is a way of opening the server GUI window
It can only be displayed when a user is logged-in and their desktop is running.
When the server is started during the system boot-up and the log-in screen is displayed awaiting a log-in, a user owned desktop is not yet started. In that case the GUI icon must be started separately when a user owned session begins.
In your text editor open the file that controls the apps to run for your log-in session. Ensure the following entry is present.
|
|
Command to display an x11vnc GUI after a user log-in |
|
|
The server window can be shown on the desktop instead of the tray icon. Edit supplementary.conf and change the appropriate value. If the server window or icon menu is too small for comfortable use, increase the size of the font in supplementary.conf. The window or icon menu will adjust to accommodate the text size. |
Summary of Files
Configuration and profile files:
.config/ssh-conduit/
├── cli
│   ├── profiles
│   │   └── ssh-conduit template profile.cli
│   └── cli.conf
├── sshfs
│   ├── profiles
│   │   └── ssh-conduit template profile.sshfs
│   └── sshfs.conf
├── sshuttle
│   ├── profiles
│   │   └── ssh-conduit template profile.sshuttle
│   └── sshuttle.conf
└── ssvnc
    ├── profiles -> /home/USERNAME/.vnc/profiles
    │   ├── ssh_known_hosts
    │   └── ssh-conduit_template_profile.ssvnc
    └── ssvnc.conf


/etc/ssh-conduit/
└── x11vnc
    ├── supplementary.conf
    └── x11vncrc
Executable files:
/usr/local/bin/
├── ssh-conduit-admin-centre.sh
├── ssh-conduit-cli.sh
├── ssh-conduit.sh
├── ssh-conduit-sshfs.sh
├── ssh-conduit-sshuttle.sh
├── ssh-conduit-ssvnc.sh
└── ssh-conduit-x11vnc.sh


/etc/init.d/
└── ssh-conduit-vnc-server
Library files:
/usr/local/lib/ssh-conduit/
├── button-icons
│   ├── Ad-Hoc-16.png
│   ├── Cancel-16.png
│   ├── Check-16.png
│   ├── Close-16.png
│   ├── Help-16.png
│   ├── Network-Disconnected-16.png
│   └── Target-16.png
├── tray-icons
│   ├── ssh-conduit-f-48.png
│   └── ssh-conduit-v-48.png
└── lib-ssh-conduit-suite
Log files:
/var/log/
├── ssh-conduit-x11vnc.log   (x11vnc)
└── syslog                   (sshuttle)
