 |
Blender : Modelling clouds or
mist with Blender
By Saraja Olivier |
 |
|
Blender : Modelling clouds or
mist with Blender
By Saraja Olivier |
|
Call the Texture Buttons (F6-KEY or ![]() )
and add a new texture (ADD NEW) by clicking on the
)
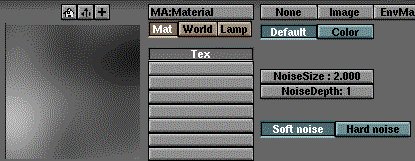
and add a new texture (ADD NEW) by clicking on the ![]() button. A row of texture types should appear. Pick
button. A row of texture types should appear. Pick ![]() in order to access the cloud procedural texture parameters. Set NoiseSize:
2.000 and NoiseDepth: 1.
in order to access the cloud procedural texture parameters. Set NoiseSize:
2.000 and NoiseDepth: 1.
Let's go back into the Material Buttons
(F4-KEY or ![]() )
to tune our parameters. In the right area devoted to the texture parameters,
replace the default pink colour by an immaculate white : R 1.000,
G 1.000 and B 1.000 (a light green or grey could be very
good looking in the case of a mist). Activate the Col and Alpha
buttons. Set SizeX 0.500 and SizeY 2.000. At last, set the
Alpha channel with the Var 0.250 slider. These last parameters will
certainly have to be adjusted in the case of a mist (in particular, you
can try to set SizeX and SizeY to 0.250 or 2.000 and see
the result).
)
to tune our parameters. In the right area devoted to the texture parameters,
replace the default pink colour by an immaculate white : R 1.000,
G 1.000 and B 1.000 (a light green or grey could be very
good looking in the case of a mist). Activate the Col and Alpha
buttons. Set SizeX 0.500 and SizeY 2.000. At last, set the
Alpha channel with the Var 0.250 slider. These last parameters will
certainly have to be adjusted in the case of a mist (in particular, you
can try to set SizeX and SizeY to 0.250 or 2.000 and see
the result).
Good looking, isn't it ?

|
|